Here is another How-To on GTK/libpeas plugin development. This time it is on how to use the GTK Inspector to dive into application details.
How to enable GTK Inspector
Before we can start we have to enable the GTK inspector with
gsettings set org.gtk.Settings.Debug enable-inspector-keybinding true
Now with any GTK application you can open the GTK inspector by pressing either Ctrl-Shift-I or Ctrl-Shift-D. If this doesn’t help try launching with
GTK_DEBUG=interactive liferea
Discovering widget names with GTK Inspector
When you have successfully launched the inspector you should see a window like this:
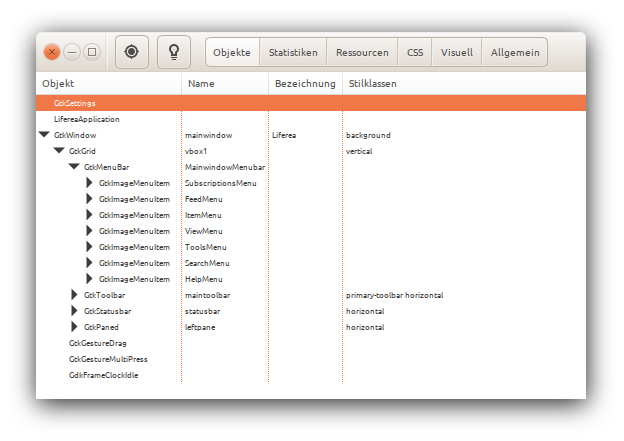
Note the second column Name in the Objects tab containing all those widget names we covered in part 2+3 of this tutorial.
Trying GTK CSS styles
If you select the CSS tab you get a inline editor to try style changes in Liferea. If you make modifications successfully you can save them to disk and make them permanent.
For quick effect try entering
treeview {
  background-color:red;
}

button {
  font-size: 200%
}
and notice the immediate changes.
To address widgets by name ensure to always prefix the widget type selector. For example to change the itemlist treeview do
treeview#itemlist {
  background-color:green;
}
and not just (as one would in HTML)
#itemlist {
  background-color:green;
}
You probably also noticed that widget type names are not GtkTreeView but treeview, not GtkButton but button and so on. Just lowercase and strip Gtk and you have the selector name.
Experiment with GTK settings
Finally check out the Visual tab which exposes all major GTK settings on a per application basis. Here you can try fonts, theme setting, dark variant…
Related
Also check out the other plugin tutorial posts
- Plugin Tutorial Part 1 (Plugin Boiler Plate)
- Plugin Tutorial Part 2 (Acessing and modify UI elements)
- Plugin Tutorial Part 3 (Adding menu elements)
- Plugin Tutorial Part 4 (Using GTK inspector)
- Plugin Tutorial Part 5 (Enabling translations for plugins)